Well, I said I’d give it a go so here goes.
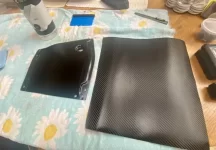
The customer asked for the bash plate on his Pikes Peak V4S to be carbon fibre wrapped in order it blends in with all the CF add-ons he’s got on his bike. I could have farmed to job out to a detailer in Cork but it’s something I’ve fancied learning for a good while so so thought I’d give it a go. Worst case it’s going to cost me some time and the cost of the vinyl so here goes.
The first thing I had to do was to learn about the different types of vinyl wrap available. There’s thousands of resellers out there on eBay and Amazon selling carbon fibre wrap by various cut lengths (it comes in rolls from the manufacturer that are typically 60” wide by 20-25mtrs long - don’t even bother to ask why one dimension is imperial and the other metric) and they’re all different prices for what appears from photos to look the same.
Vinyl wraps falls into 2 types (ignoring colour and finish) calendered and cast. The former is made by squeezing the liquid vinyl between 2 massive rollers, the latter is made by pouring liquid vinyl into a moving mould. Cast vinyl is about 3x the price of calendared vinyl, but, it’s significantly more pliable and flexible. If you were doing big flat(ish) panels you might use calandered but if doing small intricate parts with several curves etc such as motorcycle body panels you definitely want to use cast vinyl and the best make is by 3M.
First job was to track down a supplier as I don’t want, or need a full 25mtr roll. Fortunately there’s a wrapping/detailing business in Cork who’s also a 3M reseller and he very kindly agreed to sell me just 1mtr of the stuff. €82 though. As an example calendered wrap was just €26/mtr.
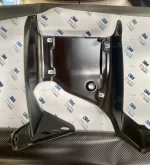
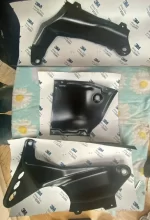
First things first, got to break the bash plate into its 3 constituent parts and then remove all the fittings off it.


Next, cut some wrap that’s big enough to do each part.

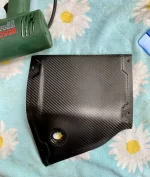
I started with the centre part as that’s got the easiest shape to it, bar the indentations and channels.

The part was decreased with isopropyl alcohol, dried with a clean microfibre cloth them the vinyl stripped of its backing and laid on the part.
Starting from the centre push outwards with the squeegee spreader thingy - the blue thing in the photos. This pushes any air bubbles to the edges.
The 3M film is very pliable and very easy to be work with. If you’re not happy simply peel it off and reapply it. Use the squeegee to push it into the indents. Apply a little heat with a heat gun if necessary to soften it further and it can then be stretched into the indents easily.
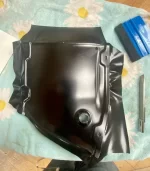
Once done, flip it over

Now trim it, especially the corners, as you don’t want the material to bunch, and start to stick it down on the inside.

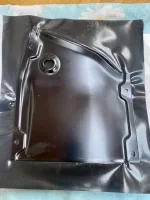
I made a small X in the screw holes so the bolts can pass through when I reassemble it, and made 4 cuts in an asterisk * shape for the larger hole where the fuel tank drain passes through.
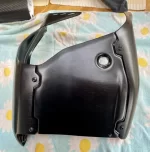
Finally, 45 mins later, my very first wrapped piece is completed and, whilst I don’t want to jinx it for the other pieces, I’m quite pleased with the end result.


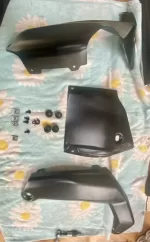
Now to do the 2 more awkward shaped bits.
The customer asked for the bash plate on his Pikes Peak V4S to be carbon fibre wrapped in order it blends in with all the CF add-ons he’s got on his bike. I could have farmed to job out to a detailer in Cork but it’s something I’ve fancied learning for a good while so so thought I’d give it a go. Worst case it’s going to cost me some time and the cost of the vinyl so here goes.
The first thing I had to do was to learn about the different types of vinyl wrap available. There’s thousands of resellers out there on eBay and Amazon selling carbon fibre wrap by various cut lengths (it comes in rolls from the manufacturer that are typically 60” wide by 20-25mtrs long - don’t even bother to ask why one dimension is imperial and the other metric) and they’re all different prices for what appears from photos to look the same.
Vinyl wraps falls into 2 types (ignoring colour and finish) calendered and cast. The former is made by squeezing the liquid vinyl between 2 massive rollers, the latter is made by pouring liquid vinyl into a moving mould. Cast vinyl is about 3x the price of calendared vinyl, but, it’s significantly more pliable and flexible. If you were doing big flat(ish) panels you might use calandered but if doing small intricate parts with several curves etc such as motorcycle body panels you definitely want to use cast vinyl and the best make is by 3M.
First job was to track down a supplier as I don’t want, or need a full 25mtr roll. Fortunately there’s a wrapping/detailing business in Cork who’s also a 3M reseller and he very kindly agreed to sell me just 1mtr of the stuff. €82 though. As an example calendered wrap was just €26/mtr.
First things first, got to break the bash plate into its 3 constituent parts and then remove all the fittings off it.
Next, cut some wrap that’s big enough to do each part.
I started with the centre part as that’s got the easiest shape to it, bar the indentations and channels.
The part was decreased with isopropyl alcohol, dried with a clean microfibre cloth them the vinyl stripped of its backing and laid on the part.
Starting from the centre push outwards with the squeegee spreader thingy - the blue thing in the photos. This pushes any air bubbles to the edges.
The 3M film is very pliable and very easy to be work with. If you’re not happy simply peel it off and reapply it. Use the squeegee to push it into the indents. Apply a little heat with a heat gun if necessary to soften it further and it can then be stretched into the indents easily.
Once done, flip it over
Now trim it, especially the corners, as you don’t want the material to bunch, and start to stick it down on the inside.
I made a small X in the screw holes so the bolts can pass through when I reassemble it, and made 4 cuts in an asterisk * shape for the larger hole where the fuel tank drain passes through.
Finally, 45 mins later, my very first wrapped piece is completed
and, whilst I don’t want to jinx it for the other pieces, I’m quite pleased with the end result. Now to do the 2 more awkward shaped bits.
 . I’m aware of hydro-dipping but that’s a much thinner and less durable coating so I didn’t consider it for this item due to its placement under the bike, in the line of fire if the front wheel.


 . Each heel guard took about 20-30 mins to get it just right. The bash plate took about 45 mins for the first piece, the base plate which is a relatively straightforward shape; 20 mins for the second (the LHS piece) as I was more used to it but then 45 again for the RHS piece as it was a much more awkward shape with bends that go in 2 different directions.