Yay, welcome to life in a fucken long term relationship dude!Gunna sound proof the wall it's going on as it's backs onto what will be the guest room... can't have my very limited fun time messed up just cause we have mates over!!!!


Yay, welcome to life in a fucken long term relationship dude!Gunna sound proof the wall it's going on as it's backs onto what will be the guest room... can't have my very limited fun time messed up just cause we have mates over!!!!

Dunno about long term..pretty sure I'll be sacked as soon as the house if finished...Yay, welcome to life in a fucken long term relationship dude!

It won't be done anytime soon put it that way...Yeah, string it out.

Or let them sleep in the garage with your bikes againGunna sound proof the wall it's going on as it's backs onto what will be the guest room... can't have my very limited fun time messed up just cause we have mates over!!!!
 i wonder who that was ?
Yes mate, it's slightly bigger! Still only a small house but big enough for 2.Or let them sleep in the garage with your bikes again
Bet your pleased to have a tardis for ahome compared to your little box room you had in Southall
It looked like it was gunna rain so I held back on the wallpaper... guess I could have started on the interior stuff but I was thirsty...I cannot believe the wallpaper isn't yet up.

It will be paradise when it’s finished pal.So on Tuesday I went to auckland for the 3rd time in 10 days!!!!!! This time an 8 hour round trip to pick up the big set of bifolding doors for the dinning area. Bargained him down 200 bucks as well..
It doesn't normally take so long to get to auckland but the main highway is closed due to a slip and the diversion adds 20-45 mins depending on traffic.
Also when I was picking up the doors I spied a window that would be perfect for the kitchen. Funds are very low and we don't "need"the window for quite some time, but, I made him a ridiculous offer, he refused but came back with a very generous one.
This necessitated a trip to an atm and added another 40 mins to the mission..
Anyhu , got it all home with no broken glass so happy days.
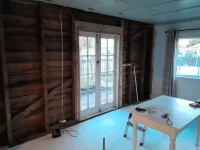
Weds put french doors in, Thurs after 3.5 hours and 6 different merchants picking up materials I started the refurb on the French doors.
Will put a bit of a blurb up about the process later but given the late start I only manged to 1st stage prep one door before I had to put it back in for the night..
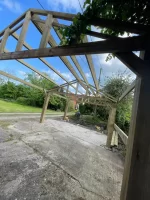
Anyhu, some pics... check out my workshop! Not bad views and plenty of ventilation...
View attachment 106231View attachment 106232View attachment 106233View attachment 106234View attachment 106235View attachment 106236View attachment 106237View attachment 106238View attachment 106239
Bought !Lost or Found??
Thanks cat!!! I had the few more wether I deserved em or not!!!I'd say you deserved that beer, if not a few more too. Good effort !!

Glad to see you got a thumb shot in the last picToday I got around to doing a Lil more work on the patio doors that we bought for the bedroom.
In the previous pics I posted I had sanded em back and planed a Lil offe the tops and bottoms.
Although they had been stored inside for a while, the paint had broken down and the timber was quite damp.. I scraped and sanded em back in prep for the new paint but also to let the air get at em and dry em out.
I don't have a moisture meter but over the last few days, visibly and to the touch they have dried out enough that I'm happy to apply fillers and paint.
They are in pretty good order but do have a few issues. The mortise and tenon joints are blind, as in not through, and had no mechanical fixings, relying only on glue, which had broken down...
I'm far from an expert in these things but have had the pleasure of overhauling many windows and doors over the years..
One of the biggest problems is where the joints between the styles and rails meet .
Sanding, filling and painting looks great for a few weeks or months but the joints always crack. Not only does it look ugly but it allows water in, which ain't good...
Failing removing all the glass, disassembling the doors and re-gluing, what can you do?
Also most likely you will destroy the doors trying this depending on how they have been assembled...
My attack is sand the paint back, not necessarily to bare wood but if it comes off easy enough then yes.
This is to let the wood dry easier/faster and needs doing anyway befor painting..
Cut out any rot and or treat with hardener.
Let dry for as long as possible and necessary.
Drill and dowel through mortise and tenon joints and use a quality resin epoxy to fix dowels and work into all joints and cracks.
Clamp up and don't rush things. The epoxy may feel dry but leave for as long as possible before fucking about!!!
These doors were a fèw mm short so I had to clash some on. Pointless clashing a few mm on as it's hard to fix! So I cut 15mm off and glued and screwed on 20mm..
Next up ( after I do the 2nd door) I will shoot the doors in to get all gaps perfect and prime with an oil based pigmented sealer ( waterborne products have come along way but are still shit in my mind!) Before I do cosmetic filling and top coats..
This won't be for a few weeks as the framing tinber I used for the door opening was a bit wet so I will let dry before fixing frame proper and setting door gaps..
Not sure if any of this is of interest to anyone at all bit I can't sleep so...... also, as said ,I'm no expert but have had good success with these methods. any advice or pointers about how it could be done better wouldn't be taken badly!!!
..View attachment 106392View attachment 106393View attachment 106394


I think it’s a great thread, learning a lot from watching what you’re doing.Not sure if any of this is of interest to anyone at all bit I can't sleep so...


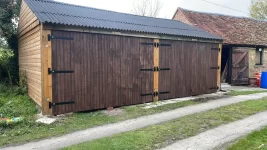
Nice one bro!!!! Looks the dogs!I’ve just finished the outside of our Gaaaarage ( Jo christened it ) add black porcelain floor to finish
Selfish gitNearly killed mecould of done with some help from my mate who’s a chippy but he fecked off to NZ
You got his number? I could use a hand and happen to live in nz now....Nearly killed me
Chiz, that's some grand work lad, wish I had your skill with wood, me I find it hard to cut a straight line with a rip sawDone another lap on the French doors today.
Got the bulk of the filling done and a sealer on one side of each door and the outside edges if the frame.
I'm using and oil based pigmented sealer thined back quite alot for a primer/ sanding sealer.. as I mentioned before I'm not a fan of waterborne products for joinery at all .
The piggy seal sticks to almost all surfaces/paints, soaks in real good and sands up nicely. I've seen water based primer break down in a matter of months on windows and I believe it's because it doesn't soak in to the timber..
Anyhu, on the frame you can see where part of the cill had busted off. I resin'd and screwed the busted bit back on befor 2 part filler . It's come up mint...
I think we have decided to push on and get the bedroom finished befor cracking on with the rest of the re-pilling..
Means I wasted a few hours stripping wall paper and painting but will mean we have at least one clean living space when the French doors are finally fitted. we can come and go through them and have the other openings closed of to keep the dust out while we crack on in the rest of the house..
This may change though!!!
I've thrown about 12 hours labor at the 2 doors and frame so far and they are mostly ready to fine fill and paint, I'm pretty pleased with that..
Some pics of not alot...
View attachment 106991View attachment 106992View attachment 106993View attachment 106994View attachment 106995View attachment 106996