Kawasaki KR1000 Endurance Replica

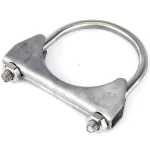
As I said many moons ago when Alan questioned the pipe clips I had already ordered some Mikalore ones before all the bitching started, are yours an inferior brand or un-branded?. Oh, and stop copying me then blowing loads of smoke 🤪

Now shush, I'm working on my Exige :love:

View attachment 83259
But aren’t Mikalor clips even bigger and uglier than jubilee clips (albeit perhaps stronger)?
Personally I think @CAT3 is right and the Oetiker single ear is the one to use 👍
 
But aren’t Mikalor clips even bigger and uglier than jubilee clips (albeit perhaps stronger)?
Personally I think @CAT3 is right and the Oetiker single ear is the one to use 👍
I had already ordered these prior to the monkey fight 🐒


s-l1600.webp
 
I don't know, you try & help a guy with the benefit of your experiance & all he does is riducule one little bracket :rolleyes: I thought is was quite nicely executed to be honest, it took me ages to file it to shape ! :ROFLMAO:
Plus, I have plans to get the bike on the road & use it, sooner rather than later, or much later in Exi's case going off current progress, (his thread is now mahoosiff & spans more than one decade) :LOL:
I am wondering if he's just posting on my thread just to build my reply tally up ? :unsure:
 
I don't know, you try & help a guy with the benefit of your experiance & all he does is riducule one little bracket :rolleyes: I thought is was quite nicely executed to be honest, it took me ages to file it to shape ! :ROFLMAO:
Plus, I have plans to get the bike on the road & use it, sooner rather than later, or much later in Exi's case going off current progress, (his thread is now mahoosiff & spans more than one decade) :LOL:
I am wondering if he's just posting on my thread just to build my reply tally up ? :unsure:
Ditto :ROFLMAO: but the bracket is a bit poo (not the bracket itself but the overall execution and application :))

You didn't answer if you had copied my posh pipe clips with cheap unbranded ones 👀
 
Fitted the last new Engine Seal last week in readiness for dropping oil in the motor this week. It might have electricity by the end of the week as my mate Dave of Mutts Nutts Emporium is calling round to do some wirey witchcraft stuff at the end of the week 👀


IMG_6936.webp


IMG_7046.webp


All back together and torqued up...

IMG_7052.webp
 
The seat unit was sturdy enough once fitted with the 6 point fixings to the point where I nearly did away with the small rear sub frame - but decided to keep it for the rear brake light above. This meant I didn't need to drill holes in the seat unit to mount it.

And as a belt and braces to stop any flexing I have fitted 4 adjustable rubber buffers which kiss the inside faces of the fibreglass. Again, no holes required in the seat unit which is nice :)

IMG_7282.webp


IMG_7283.webp
 
Soooo, Lecrticity Witchcraft Stuff commenced on Thursday and by the afternoon we had a full cobbled together wirery muddle with everything working, engine turning over and a spark 💥

My involvement at this stage was making the Tea and to decide on routing and connection points for the new loom which was about to be built 🍵

IMG_7297.jpg


IMG_7298.jpg


IMG_7300.jpg


All the sub looms connect under the front seat rail support for ease of access and hidability...

Still not got my Starter Cable yet from my manufacturer so just ran an over length cable down the side of the bike for now.


IMG_7321.jpg


I have something planned for the main two looms that run front to back, I need to trial first though...

IMG_7323.jpg


IMG_7324.jpg


Front connections to finish off next week...

IMG_7325.jpg


Rear is almost done, just waiting for my Starter Cable... I added the red PVC edge trim to stop any chaffing on the seat rail supports...

IMG_7327.jpg


I also added two posts and a raised cover (Aluminium Bonded with ABS) to cover all the loom connections up - not that you see anything when the set unit is on but thought I'd tidy it up for when it's naked...

IMG_7328.jpg


Maintaining easy access to the main Fuse.....

IMG_7329.jpg


That's all for now, a big thanks to my mate Dave of Mutts Nuts fame :)(y)
 
Last edited:
Electrickery finished this evening 🥳 apart from the tidying up the layout of the wirey bits...


Kawasaki KR1000 Replica 721.webp


Kawasaki KR1000 Replica 722.webp


Just ordered some aluminium sheet and neoprene rubber sheet to make a little wire tidy support.

Card board cut as a template for when it arrives - it will bolt neatly to either side rear coil mounts which was handy...

I'm also waiting for some material for the main loom as I have an idea that might look quite neat, more to follow if it works.... 👀

Kawasaki KR1000 Replica 723.webp


Kawasaki KR1000 Replica 724.webp
 
Soooo, my harness routing method works 🥳

The frame had welded on nuts for this when it was built but I didn't know at the time if it would fit.

I used a 15mm aluminium tube and bent it into shape to route from the front of the tank to the rear for the main two looms to run inside. Clearance to the frame, tank and carbs is all good.


Kawasaki KR1000 Replica 725.webp


Kawasaki KR1000 Replica 726.webp


Kawasaki KR1000 Replica 727.webp


The two looms in the foreground will be in the tube so no need for tie wraps round the frame tube which is nice 🥳


Kawasaki KR1000 Replica 728.webp


Kawasaki KR1000 Replica 729.webp


Kawasaki KR1000 Replica 730.webp


I have now slotted the tube with a hand nibbler and just need to spread the slot to a width of 5mm so the wires can be fed in. I have a rubber window seal extrusion on order that can be modified and will clip into the full length of the slot for neatness.....


Kawasaki KR1000 Replica 731.webp
 
Just an opinion, would it be worth hiding the wires in an appropriate sized armoured flexi hose. Then it would look like just another bike gubbins bit
 
Back
Top Bottom