900GTS build...

Ignition Curves...

I spent an exciting time dismantling the Silent Hektik ignition unit, primarily to see if I could mount a bracket somewhere as it come in a vanilla RS style aluminium enclosure - with no obvious way of fixing the unit.

I took the screws out and it charmingly vomited a pile of unsecured spacers over the garage floor.

Further investigation revealed assembly techniques that do not do the German reputation any good; save it to say the main circuit board is now secured by brass pillars secured with threadlock - just in case I ever want to remove the main board again. FX: Sigh. Looks like it will be secured with tie wraps, then. Lovely.

It all looks quite neat so I am not worrying that their lacklustre assembly techniques came from anyone in the electronics team.

Anyway, on to the meat of this post.

The GTS engine is not standard and in any case, I wouldn't want to duplicate the step advance present in the early Motoplat GTS ignition, so bearing in mind the high compression pistons and extra capacity, I have chosen the one of sixteen advance curves offered by the Silent Hektik unit that most closely resembles the later Bosch ignition curve which is:-

900-1,800: 9 degrees
1,801-2,800: 16 degrees
2,801-4,000: 28 degrees
4,001-MAX: 32 degrees

I have shown it with the above advances shown as a step overlay - as it is an analogue system I expect an approximate curve however the ignition rotor does have steps, so the curve might be a series of gradients with sharper rises. Conjecture.

SilentHektik32DegreeAdvanceCurvesOverlay.jpg


I have selected option 8 as the closest, any (useful :) ) comments?
 
Last edited:
Imposable to say without getting it set up properly but as a rule of thumb i would go with the curve that just starts to get it pinking and knock it back one. How much higher have you gone on compression because that might rule my rule of thumb out anyway. Do you have a cranking pressure ?
 
My Sachse box is programmable. I put it to number 4 which is the closest to the standard profile. It has a spark that would light a coal fire (also courtesy of my Czech coils), starts first kick and ticks over like a watch. I never felt the need to fiddle with it after that!
 
Imposable to say without getting it set up properly but as a rule of thumb i would go with the curve that just starts to get it pinking and knock it back one.

I chose 8 as it is a bit less agressive.

How much higher have you gone on compression because that might rule my rule of thumb out anyway.
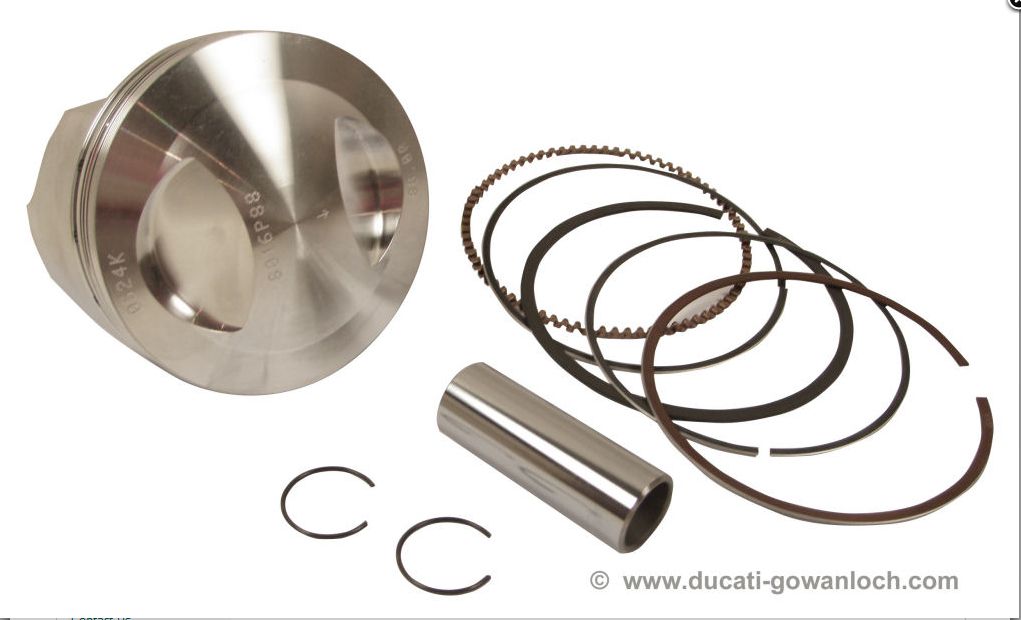
The pistons are these Wiseco's from Gowanloch. I don't know what the new CR ration is (FX: Blush).
Wiseco88mmPistons.jpg

Do you have a cranking pressure ?
Errrr.... no. I might have to find out.
 
Wiseco..theres a name from the past..I had a 1105cc Wiseco kit in my z1000 Harris i built 25 years ago :) It blew head gaskets every 200 miles, i even put in Dragster APE head gaskets in the end and it still blew them. !!
Did you get the last invoice in the end ? No rush just wondered if it got through :)
 
Sillent Hektik Coil Terminals...

I am just completing the sub-loom for the Silent Hektik ignition. Here is the wiring diagram:-
SilentHektikConnectionDiagram.jpg


Which is easy enough to follow except... It marks the coil terminals as +ve & -ve but doesn't identify which is which and they aren't explicitly marked on the coils. One is green & one is black...
SilentHektikCoilConnections.jpg

I expect black is -ve & green is signal, what thinks you?
 
Rearsets...

... and I thought this would be the easy bit as I had spent time planning & measuring! More fool was I.

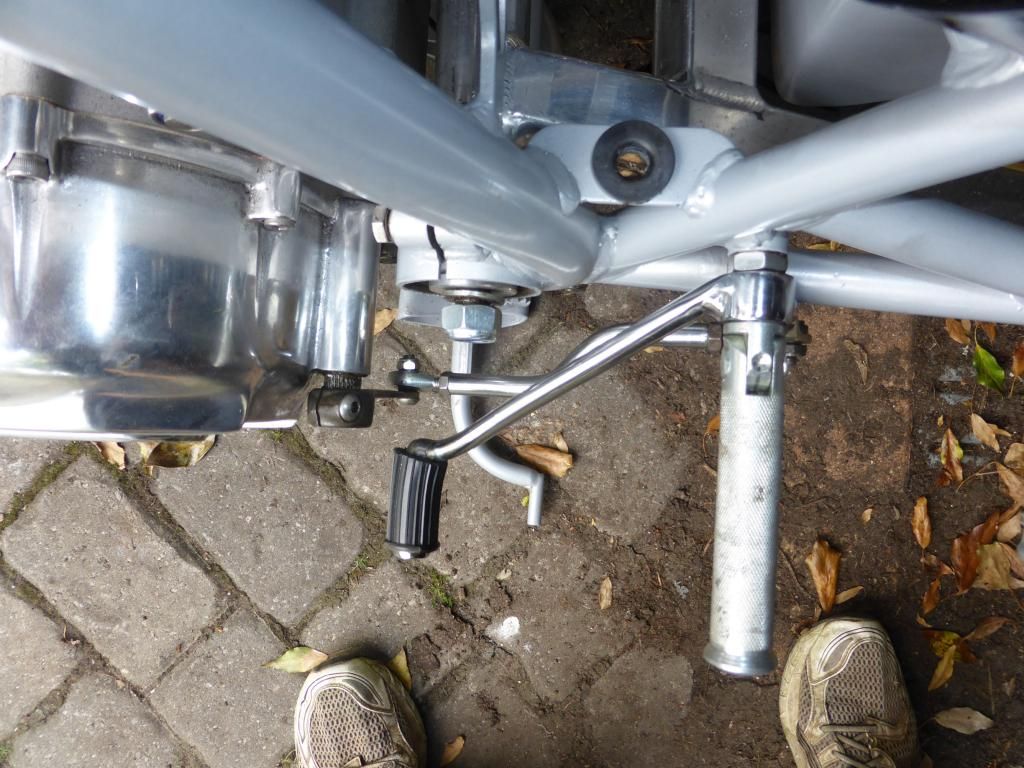
It turns out the GT clutch cover has a longer housing for the gear crossover shaft; This is to leave room for the rearsets on the SS.

A quick shufti dug up a crossover shaft 2cm shorter than standard and a close inspection revealed a braze half way along the shaft. I guess I addressed this problem 25 years ago on another bike.

Anyway, it still left me with a casing 2cm to wide, so without further ado out with the hacksaw and an hour of hand dressing the casing, the shorter crossover shaft is now installed and the cover is neatly (vanity!) adjusted. You can see the chunk I hacked off...
P1000550.jpg

I still have a few changes to make but it all fits together a lot better. I have also had the gear lever welded up, so all is looking positive. If you saw the bike I bet you would never have noticed without me telling you ;-)

FX: Phew!
 
Very neat. Hope you didn't pay too much for the non E/S clutch cover! Would be gutting to have to start chopping bits out if you'd paid the current market price.
 
Most of those covers get cut down Derek, most people who fit them are either fitting to an SS or want to use rearsets on a pre bosch engined bike., as i say an original cut down one is hens teeth. Consequently the shorter shafts are equally as rare.
 
They are worth a lot of money either long or short. No one makes a replacement unlike the ones for Bosch engines,..I get asked for them all the time. I had a guy after one this morning...no chance is always my answer. Bit like 1975 SS crankcases....:)
 
Oh yes, sorry about that but its Sassi cover so will cost more to get it finished that it cost to buy :)..but you are right, ok for an emergency
If you find a good original under £500 WELL DONE :-)
 
Gearchange LH rearset...

Right. Nailed it. Unfortunately I had to use my reserved for special occasions 750/900SS RH gearchange linkage, part #: 079769615 CONTROL ROD; Use might be too gentle a word, I had to modify it.

I was unhappy as the standard 900SS gearchange linkage comnponents were right at the end of their adjustment and didn't fit well.

The early RH gearchange linkage uses two 7mm thread forks both ends to do it's job whereas I needed 7mm one end and 6mm with rose joint t'other. So I 6mm helicoiled one end and everything just fits together - and I have some adjustment.
P1000561.jpg


Unfortunately it screws me for my right hand gear change special but I'll have to deal with that when the time comes.
P1000563.jpg


If anyone can throw some light on my earlier SilentHektik/Coil question, Ill be very grateful. Think pint(s)...
 
Last edited:
I would guess that green is ground, however the coil works on AC so it doesn't mind which way round it is wired. The spark will travel in opposite directions depending on how you wire the coil. Spark from plug centre electrode to the end electrode is better as the centre electrode is hotter.

http://mgaguru.com/mgtech/ignition/ig104.htm

Mike


If anyone can throw some light on my earlier SilentHektik/Coil question, Ill be very grateful. Think pint(s)...
 
Pint...

Thanks Mikesp,

That's a really interesting article, thank you. I am going to make a support query in any case to SilentHektik; The article you highlighted says:-
'End result is a difference of 15 to 30 percent in voltage required to make spark "initially" jump the gap on the plug depending on which way it is going. So the spark plug prefers to see a voltage potential that is negative on the center electrode and positive on the end electrode for the very first hop of the spark.'

So that's what I'd like to do. It doesn't make any difference to the sub loom which around way I connect the coils so I can press on in the meantime whilst awaiting an answer from SilentHektik.

I have a bit more wiring to do, fill it with oil, bleed the brakes and I might do some work on the dash; My LM317's, relays & LDR's have arrived and if I can find a way to include some extra circuitry I might just make my Mega bright LED's dim when it's gets dark. I also have to fit the carbs, choke & throttle cables and order the number plate.

The two into one Verlicchi exhaust is back (again) from the blasters so that needs a thorough spraying with VHT paint, which I already have ready.

So I have a week or so.
Update...
This just went off to SilentHektik...
Hallo Silent-Hektik,

Dies ist eine Frage an unseren Support.

Ich habe einen Silent-Hektik ignitiopn System für meine 1978 900GTS Ducati gekauft. Ich freue mich über alles aber ich habe eine Frage. Es ist mir nicht klar, aus der Darstellung in der Dokumentation (E_D_hkz_05.pdf), die Klemme auf der Spule + ve und-ve-Welches ist. Die Spulenanschlüsse sind schwarz und grün, werden Sie bitte lassen Sie mich wissen, wie die Anschlüsse angebracht werden soll. Ich habe eine aktualisierte Version des Diagramms, um das Problem zu veranschaulichen befestigt - bitte an den Spulen schauen und lassen Sie mich wissen, ob das, was ich getan habe, richtig ist oder nicht.

Mit freundlichen Grüßen, Paul.

In English, my native tongue...

Subject: Support query: Coil connection polarity...

Hello Silent Hektik,

This is a support question.

I have bought a Silent Hektik ignition system for my 1978 900GTS Ducati. I am pleased with everything however I have a question. It is not clear to me from the diagram in your documentation (E_D_hkz_05.pdf) which terminal on the coil is +ve and which is -ve. The coil terminals are black & green, please will you let me know how the terminals should be attached. I have attached an updated version of your diagram to illustrate the problem - please look at the coils and let me know if what I have done is correct or not.

With my best regards, Paul.
SilentHektikConnectionDiagramAnnotated.jpg

Update
I have received my support response from Silent Hektik...
Guten Tag
und danke für die email.
Der Plus ist auf der Zündspule graviert und in
der Anleitung und online dokumentiert:
PLUS = SCHWARZ
http://www.silent-hektik.de/Zub_JapC.htm
MFGruss Toni Kurpas

Which translated means:-
Good day
and thanks for the email.
The Plus is engraved on the ignition coil and in
the instructions and documented online:
PLUS = BLACK
http://www.silent-hektik.de/Zub_JapC.htm
MFGruss Toni Kurpas
Well, I guess that's telling me then. I couldn't see the +ve sign on the coil - but then again I only used a magnifying glass and I can't see it on the web page he points me at, or in the instructions except in my own annotation; But there you go. Must be a German thing.

FX: Blush - found it! he was right, it is in the instructions. Off for some humble pie....
'On the TEC & Jap ignition coils is black the plus.'

At least I know the correct way round now.
 
Last edited:
Silent Hektik sub loom...

I found it very difficult to get anything done today - loads of 'phone calls meant I had to snatch opportunities. Still, I made some progress, including building the sub loom for the Silent Hektik ignition...
P1000567.jpg

The loom just drops straight in and makes life a whole lot easier. I need to add a mega relay to protect the old & infirm (& not easily replaceable) ignition switch, I would like to have done that today but hey ho, too many distractions. I also have to tidy up the horn wiring - it only copes with one horn and I have fitted both. Should give truculent individuals a shock ;).

Managed to mount the front mudguard - much easier with the wheel out which I wish I had done first.
P1000569.jpg
 
Completed the wiring...

Fiddling with a bevel wiring loom may not seem that exciting if you don't own a bevel, but it stood between me & ridin' the bike. So for me, it's well exciting.

I have:-
  • repaired the damaged rear part of the loom
  • repaired ignition switch wiring
  • repaired the front brake light switch wiring (which was in a right mess)
  • extended the wiring to support my revised horn location
  • replaced broken pins in some connectors
  • replaced the fuse box
  • removed one member of the pair of horns
  • built a sub loom to support the Silent Hektik ignition system
  • add a 70A relay which switches power for all subsystems. I have added a separate fuse & cabling to supply the ignition from its own fuse; Hence there is now no spare fuse
  • added a sub loom for the HID lights
  • replaced the LH switchgear
  • replaced the RH switchgear with a kill switch which is related to converting to a twin cable throttle pull
  • might still add an engine earth, will be held by to the Allen screw retaining the gearchange crossover shaft.

In theory if the engine had oil, the battery was connected and all the fueling stuff was attached, I could start it. Cool!

Of course, it might just burst into flames.
 
top stuff going on here, everyone should be forced to take a look at what you started with on a daily basis just to put things in perspective :) Just pondering the loom for my special, not sure whether to adapt or start again. Leaning towards a complete fresh start so i eliminate all the old plug connectors and slide on tags. Also not sure what to do with the battery at the moment. Cant honestly say i am planing this very well. I know what i want it top look like but the detail is tricky because the whole idea of this is to advertise the business and show what you can build from "bits" ( or the stuff i cant sell as it happens) :-) therefore i have to make do
Anyway , must not hijack your thread. Little bit jealous of your gold brembo's :)
 
Just pondering the loom for my special, not sure whether to adapt or start again. Leaning towards a complete fresh start so i eliminate all the old plug connectors and slide on tags. Also not sure what to do with the battery at the moment. Cant honestly say i am planing this very well. I know what i want it top look like but the detail is tricky because the whole idea of this is to advertise the business and show what you can build from "bits" ( or the stuff i cant sell as it happens) :-) therefore i have to make do

If I was building from scratch, I would (will) use this nifty little number with modern connectors. Simpler, saves weight... Blah ...

If I had to revert to the original loom with the GTS - I could, because I retained the old bits and fabricated entirely new sections. if anyone wants to go back to the original ignition and add sixty pounds in starter, battery, solenoids & linkages, they can.

Anyway , must not hijack your thread.
Errrr... I have been guilty of this many times so I don't see myself as in a position to complain.

Little bit jealous of your gold brembo's :)
Hah! I got those along with a load of other stuff. They were shagged original black shaved units from an early SS, faded, scuffed & then painted to hide the scuffs. I had them re-anodised which was not without problems. Apparently Goldlines were never made with two bleed nipples; They have received the new lightweight pistons.
 
yes those motogadget look good, theres someone using one on a bevel on bevelheaven forum i think? wiring on mine has sort of followed the original pattern but with the main connectors under the tank, reg/rec in place of the fusebox, fusebox behind side panel and dynatek coils, all done in thinwall cable to original colours...
 
yes those motogadget look good, theres someone using one on a bevel on bevelheaven forum i think? wiring on mine has sort of followed the original pattern but with the main connectors under the tank, reg/rec in place of the fusebox, fusebox behind side panel and dynatek coils, all done in thinwall cable to original colours...
That sounds like a lot of work. Who do you use as wiring suppliers? I used a mixture of the following:-
 
yep +1 for ^^^ used them for modern triumph/japanese connectors i couldnt source easily elsewhere
 
Back
Top Bottom